So, this month, instead of "How to Roast a Turkey" I give you "Armadillo on a Turkey Platter":

I know, it's not really the sort of thing I promised to write about in this blog, but it's what I've been spending my time on. We'll get back on track next time, I guess :)
One of the things I always jokingly said to my husband as we climbed into our late 20's was that I would bake him a "Bleedin' Armadilla" cake for his thirtieth birthday because he loves that scene from Steel Magnolias when Drum Edenton holds up his tail-end piece of armadillo cake and says, "Thanks, 'Ouisa, nuthin' like a good piece of ass!"
One of the things I always jokingly said to my husband as we climbed into our late 20's was that I would bake him a "Bleedin' Armadilla" cake for his thirtieth birthday because he loves that scene from Steel Magnolias when Drum Edenton holds up his tail-end piece of armadillo cake and says, "Thanks, 'Ouisa, nuthin' like a good piece of ass!"
As his thirtieth birthday grew closer, I began to think that this was something I could actually pull off. After all, I had already dabbled in unusually-shaped cakes for friends and family, previous birthday parties for our son (Curious George's head, a dinosaur, flip-flops on the sand, to name a few) and I had just recently worked with fondant for the first time to help a friend with some cupcakes for a baby shower.
So I searched for "bleeding armadillo" cake images on Google and found a plethora of pictures of wonderful cakes, both home-made and professionally crafted. I watched videos on YouTube for working with fondant, and how to paint it and give it texture. I got myself really excited for this challenge! I used the pictures I found on Google of other people's cakes in addition to pictures of actual armadillos for reference to decide how I wanted to make it. I settled upon aiming for one that was a good blend between cartoonish and realistic.

Troubleshooting
Most people who posted or blogged about their armadillo cake said they used a Wilton football-shaped pan, so I bought one right away. When my pan came in the mail, I admired it, then put it in the cupboard without a second thought until it was time to bake the cake. I chose Paula Deen's red velvet cake recipe that I found on the Food Network site (Grandmother Paula's Red Velvet Cake). I learned a really cool trick online for substituting the cake flour the recipe called for with all-purpose flour too! You simply replace one tablespoon of each cup of all-purpose flour with cornstarch. This seemed to work perfectly (once I got the cake to do what it was supposed to do....).
I placed by first batch of cake batter which happened to be meant for two 8-inch rounds, in the pan and it filled the pan perfectly. I placed in the oven that was pre-heated to 350˚ F (per recipe instructions) and set the timer for twice as long as what the recipe called for, thinking this would be appropriate for the doubled amount of batter in one pan. This was a mistake! An hour later, I ended up with a football-like cake that was the crispiness of a cookie on the sides and bottom, but completely runny in the middle. Cake: 1, Me: 0.
I placed by first batch of cake batter which happened to be meant for two 8-inch rounds, in the pan and it filled the pan perfectly. I placed in the oven that was pre-heated to 350˚ F (per recipe instructions) and set the timer for twice as long as what the recipe called for, thinking this would be appropriate for the doubled amount of batter in one pan. This was a mistake! An hour later, I ended up with a football-like cake that was the crispiness of a cookie on the sides and bottom, but completely runny in the middle. Cake: 1, Me: 0.
Figuring that I needed to lower the temperature and cook the cake slowly for a longer amount of time, that is just what I did on the second batch of cake batter. This time, the problem was that the cake stuck to the indentations on the pan meant to create "laces" on the football. This caused the cake to have big chunks missing on the top (Cake:2, Me:0) but I was able to make the chunks fit back in and cement them in place with some buttercream icing, and decided to use this cake as a bottom layer. Ha! Cake:2, Me: 1.
For the second layer, I decided I would get serious about getting the pan to fully release the cake, so I took extra special care to grease every single indentation, and flour every spot on the pan. I also used shortening instead of the vegetable oil I used with the other ones. This seemed to do the trick; I ended up with a cake cooked all the way through, shaped perfectly like a football with recognizable laces and everything :)

Decorating
This was my first time working with fondant on a large scale. My previous experience had been in making little decorations to top cupcakes, so I was anxious about how easy or difficult it would be to work with in covering a cake. The pros on TV all make it look so easy, but every time I watched one of them do it, I was sure that it was just a disaster waiting to happen in the hands of someone less experienced. But even so, I figured it couldn't be any worse than the result if I were to try and make buttercream look like armadillo skin, and I did make someone a promise. It turned out that fondant is pretty simple to work with if you take your time and relax.
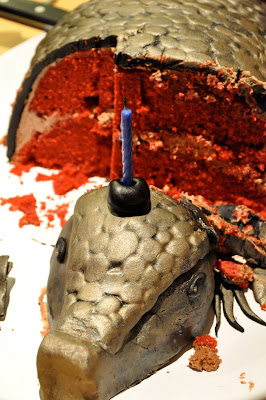
To make the armadillo's head and body, I cut one end of the football-shaped layers off at a spot that I thought looked like they could be shoulders. Then I used the parts I cut off to construct a head. I filled the layers with chocolate butter cream and secured the top layer with barbeque skewers since that's all I had. Once all the layers were covered with fondant, skewers also held the head in place.
I used the "Duff" (as in The Ace of Cakes) black buttercream flavored fondant. I used most of the two 2-lb. tubs that I purchased from Michael's to make a covering for the head and body made from cake, and constructed the ears, feet and tail entirely out of fondant. Before putting the fondant on the cake, I iced it with chocolate buttercream icing to hold the fondant on. I used a fondant cobblestone impression tile to give the skin some texture before placing it on the cake and painting it. I chose a silver spray to paint the fondant with which worked really well until I ran out 2/3 of the way through. It was a good thing I had bought a yellowish gold pearl dust as a back up plan! I mixed the dust with enough vodka to give it a watercolor consistency with the color I liked (less liquid makes the color more intense). Using vodka was a way to get around melting the fondant with water. I did watch some videos on YouTube of people using water with success, but I wanted to take as many precautions as possible, and I liked the idea of making a "drunken" armadillo! (Alcohol is also more volatile and will evaporate and dry faster than water.) I painted the armadillo with light sweeps of the brush across the cobblestone texture so that the little nooks and crannies would stay black and give my little guy more depth and texture and left him to dry over night.

The armadillo was a smash hit at my husband's party and I was happy that he liked it so much. He even insisted that we act out his favorite scene so that he could say his favorite line! The cake was tender and moist with a hint of chocolate flavor, and it went well with the chocolate buttercream. This was definitely my favorite cake project to date because of the level of challenge it provided as well as the awesome outcome.
So, that's what I've been doing this month when I'm not studying or taking care of the kids! I would say that I'll have another post for you in a couple of weeks to make up for how late I am with this one, but I'm not going to kid myself, it gets so busy around Christmas! So, I hope you and your family have an amazing holiday, and in case you don't hear from me before then, Happy New Year!!
Be well,
Melissa
For the second layer, I decided I would get serious about getting the pan to fully release the cake, so I took extra special care to grease every single indentation, and flour every spot on the pan. I also used shortening instead of the vegetable oil I used with the other ones. This seemed to do the trick; I ended up with a cake cooked all the way through, shaped perfectly like a football with recognizable laces and everything :)

Decorating
This was my first time working with fondant on a large scale. My previous experience had been in making little decorations to top cupcakes, so I was anxious about how easy or difficult it would be to work with in covering a cake. The pros on TV all make it look so easy, but every time I watched one of them do it, I was sure that it was just a disaster waiting to happen in the hands of someone less experienced. But even so, I figured it couldn't be any worse than the result if I were to try and make buttercream look like armadillo skin, and I did make someone a promise. It turned out that fondant is pretty simple to work with if you take your time and relax.
To make the armadillo's head and body, I cut one end of the football-shaped layers off at a spot that I thought looked like they could be shoulders. Then I used the parts I cut off to construct a head. I filled the layers with chocolate butter cream and secured the top layer with barbeque skewers since that's all I had. Once all the layers were covered with fondant, skewers also held the head in place.
I used the "Duff" (as in The Ace of Cakes) black buttercream flavored fondant. I used most of the two 2-lb. tubs that I purchased from Michael's to make a covering for the head and body made from cake, and constructed the ears, feet and tail entirely out of fondant. Before putting the fondant on the cake, I iced it with chocolate buttercream icing to hold the fondant on. I used a fondant cobblestone impression tile to give the skin some texture before placing it on the cake and painting it. I chose a silver spray to paint the fondant with which worked really well until I ran out 2/3 of the way through. It was a good thing I had bought a yellowish gold pearl dust as a back up plan! I mixed the dust with enough vodka to give it a watercolor consistency with the color I liked (less liquid makes the color more intense). Using vodka was a way to get around melting the fondant with water. I did watch some videos on YouTube of people using water with success, but I wanted to take as many precautions as possible, and I liked the idea of making a "drunken" armadillo! (Alcohol is also more volatile and will evaporate and dry faster than water.) I painted the armadillo with light sweeps of the brush across the cobblestone texture so that the little nooks and crannies would stay black and give my little guy more depth and texture and left him to dry over night.

The armadillo was a smash hit at my husband's party and I was happy that he liked it so much. He even insisted that we act out his favorite scene so that he could say his favorite line! The cake was tender and moist with a hint of chocolate flavor, and it went well with the chocolate buttercream. This was definitely my favorite cake project to date because of the level of challenge it provided as well as the awesome outcome.

Be well,
Melissa
No comments:
Post a Comment